Web Captioner
Who can use this feature
Site Admin, Channel Admin, Live Event Operator
Supported features: Live Events
Video Tutorial
Web Captioner Set Up
- Go to webcaptioner.com
- Make sure correct microphone input is selected in Chrome:
- Settings> privacy and security > site settings > microphone > use the drop-down to select your input
- Click "start captioning"
- In the bottom right corner click the avatar icon with the three dots to reach "Settings" > "Settings"


Web Captioner Recommended Settings
General
- “Replace censored words with” - user preference
- “After 2 seconds of no audio while Captioning” - "Do Nothing"
Appearance
- Font Family: user preference
- Text Color: user preference, default is white
- Interim Text Color: user preference, default is white
- Text size: 2.5
- Line Height: 1
- Letter Spacing: 0
- Capitalization: user preference, default is "UPPERCASE"
- Horizontal Alignment: Full
- Vertical Alignment: Top
- Padding: 0.25
OBS Settings for Web Captioner
Scene Set-Up
- Open OBS encoder
- Add to a scene, (preferably a nested scene) a "Window Capture" Source
- Name it something you can easily identify, like "Web Captioner Subtitles"
- Select the " Web Captioner" from the drop-down menu under "Window"
- Make sure the web captioner is picking up the microphone source, and confirm text is appearing in the Window Capture
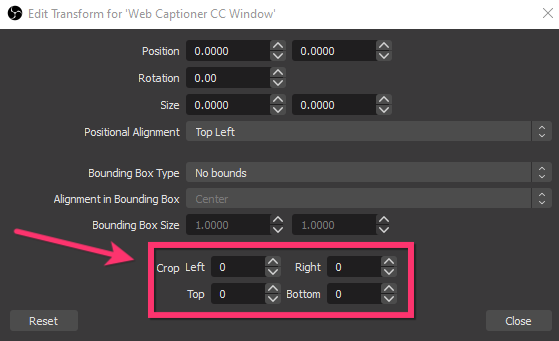
- Right-click on the window capture source and select "Transform…" > "Edit Transform" Or, left-click the source and press "Ctrl + E" to bring up the transform menu
- Use the bottom four boxes in the Edit Transform window, to crop the top and bottom to remove the UI and to display your desired amount of text lines, (preferably 2-3 lines)
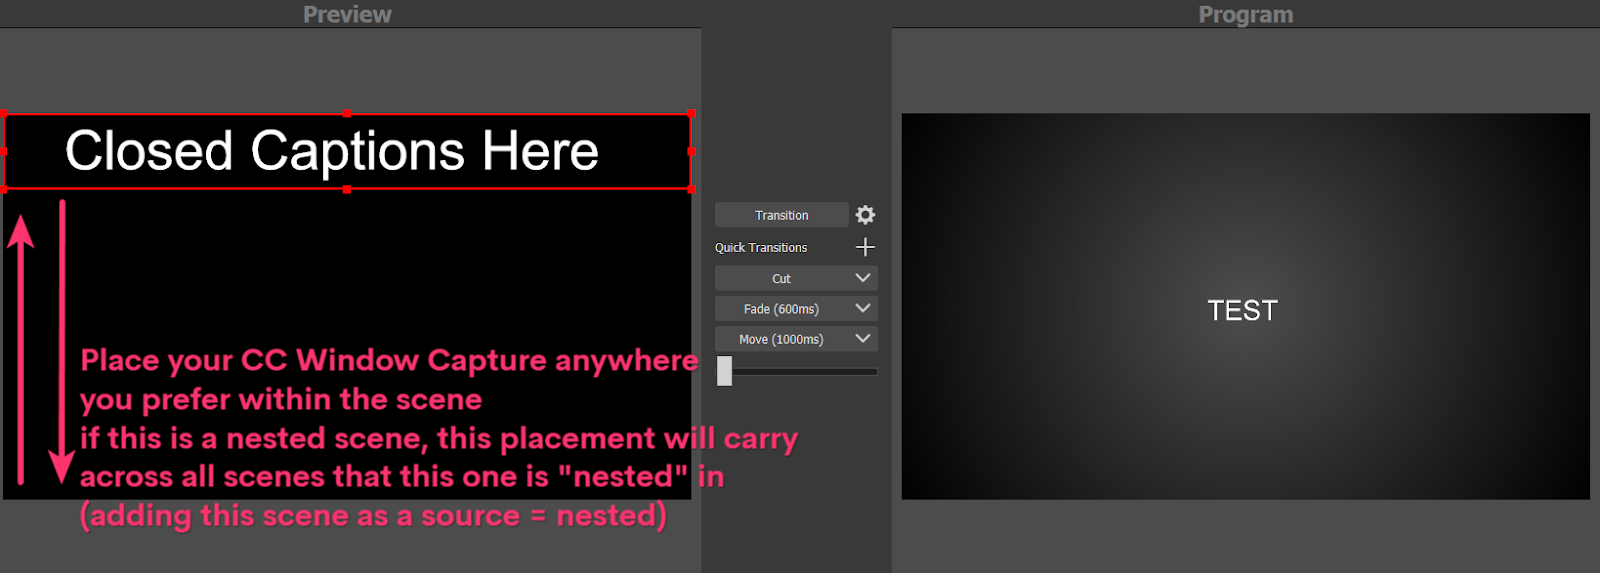
- Once you have cropped it to your desired size, place the source in the top, middle, or bottom of your scene
Another option for free cropping of a source (i.e. Window Capture) is to hold the "Alt" key and drag the red boxes of the source freely to crop out the top and bottom.


If it's a nested scene
- Add your "Live Captions" scene to all scenes requiring live captions; make sure it is at the top of the list so that the captions stay on top of all other sources in the scene
- You can adjust the position of the captions by moving the nested scene to tailor it to individual scenes. Or you can move the window capture within the nested scene for a global adjustment across all scenes
For transparent background on Web Captioner (OBS)
- Right click on window capture source, and click filters
- Add a "Luma Key" filter to remove black background
- Adjust "Luma Min Smooth" to a value of 0.2000 to make text look more crisp
